
Errata
A kind soul on Reddit pointed out that the network ranges I used for the Ceph and Proxmox cluster networks are not actually in the reserved IP address ranges. The 172.15.0.0 range actually belongs to AT&T, as per WHOIS:
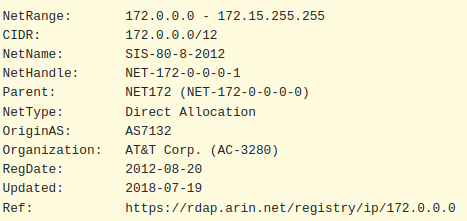
Although the networks don’t route at all, it’s still good practice to use the private ranges outlined in RFC 1918, so I will be adjusting them to the following:
PVE/CoroSync Cluster Network - 172.16.15.0/24
Ceph Cluster Network - 172.16.16.0/24
VM Management Network - 192.168.2.0/24
DMZ Network - 192.168.99.0/24
I will update the article, however please notes that some of the screenshots may still have the previous values.
Introduction
In this article I will go through the steps I took to prepare and join three Proxmox servers together into a cluster.
After installing 3 Proxmox instances on individual servers in my homelab, the next step was to cluster the servers together. Unlike VMware, which requires installing and accessing a virtual machine appliance called VCenter Server Appliance (VCSA) to manage multiple nodes, Proxmox does not have a centralized management appliance. Instead, it uses the Corosync Cluster Engine to allow communication between nodes, and the Proxmox Cluster Filesystem (pmxcfs) is used to transparently distribute the cluster configuration to all cluster nodes.
There are a number of advantages to setting up Proxmox in a basic cluster:
- Ability to migrate virtual machines and containers between physical hosts. This allows to take down a host in the cluster for configuration changes, maintenance, hardware changes, etc; while without having to bring the services offline.
- Ability to manage all Proxmox servers in the cluster from any Proxmox web interface. Any changes to the cluster will be replicated to all nodes in the cluster using corosync.
- Ability to adjust settings at the Datacenter level to affect all nodes in the cluster, rather than having to make the same change repeatedly for each host.
Preparation – Networking
This documentation outlines the technical requirements mainly around communication between hosts to allow corosync to work. It is recommended to have an odd number of hosts, to allow quorum and voting to work properly without ties.
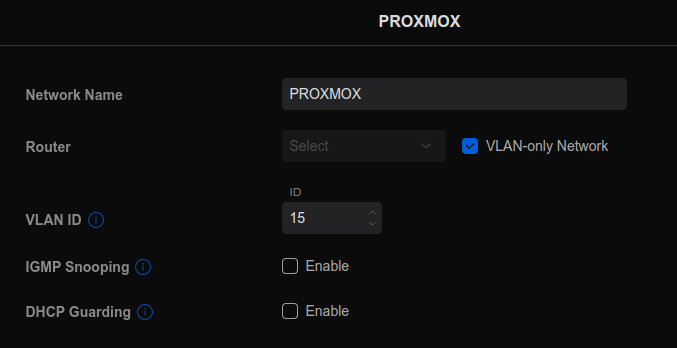
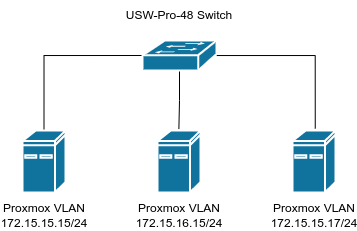
All nodes must be able to communicate with each other, and it is recommended to have a dedicated NIC for each server to allow for the cluster traffic. In my case, I used a 1Gbps NIC on each server and connected them to my UniFi Switch Pro 48, where I set the ports up in their own Proxmox VLAN.
In the UniFi controller, this is set up in Settings > Networks. I created a VLAN only network, and then assigned it to the 1Gbps ports on the switch that connected to the servers. I didn’t set up this VLAN on my pfSense router, as there will be no traffic leaving this network.
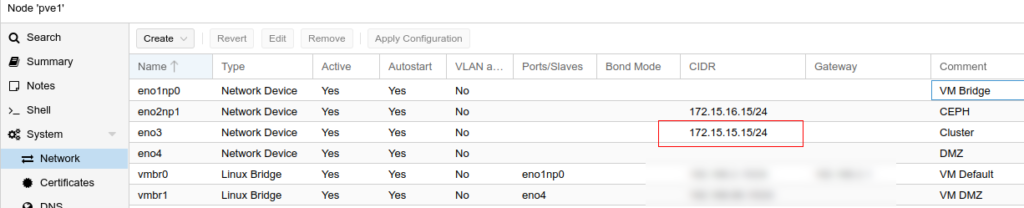
In Proxmox, I manually set the network interface to the IP as above, and labelled that interface for Cluster networking:
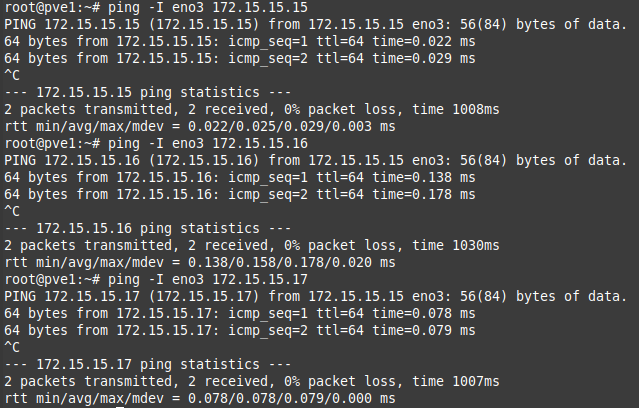
After each server had their cluster IP set up, I made sure they could ping each other on that 1Gbps interface. To ping over a specific interface, you can use:
ping -I <interface name> <IP address>
I also set up networks for Ceph and the DMZ on separate physical interfaces, as it was recommended to have all the nodes have access to the same networks, so if a virtual machine is migrated to a different node, it doesn’t suddenly lose network access. I set up separate networks and VLANs for the DMZ and Ceph. More on Ceph in a future article.
Preparation – Naming
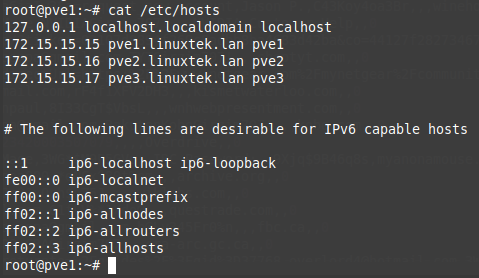
To ensure each server knows how to identify the other nodes, I edited the /etc/hosts file to add an IP reference for each so the hostname would resolve to the cluster IP.
Creating the Cluster
One caveat is that you can create a cluster on a Proxmox server with virtual machines; but you cannot add a server to a cluster which already has virtual machines created on it. Among other reasons, this is to ensure that the VM IDs don’t conflict. Fortunately, I had only created virtual machines on pve3, so I created the cluster on this server. To do so, I went to Datacenter > Cluster > Create Cluster. I chose the cluster name Proxmox (very original, I know), and selected the network interface for corosync to use (the 172.16.15.0/24 network). Once the interface refreshed, I could see the cluster name next to Datacenter in brackets.
Joining the Cluster
To join the two other nodes to the cluster, while still on the pve3 server, I clicked on Cluster > Join Information, and it displayed the cluster information for the node:
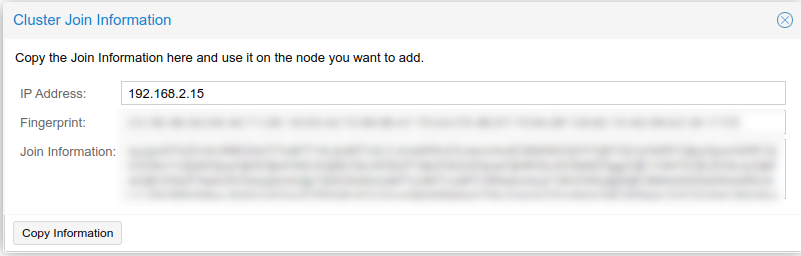
I clicked Copy Information, and then went to the next node pve2 and pasted the information under Datacenter > Cluster > Join Cluster. This auto-filled in the cluster information, join information, and IP address of the first server in the cluster. I adjusted the cluster network to the correct network interface, and added the root password for the peer server.
Once I clicked Join Cluster, the window showed progress in the Task Viewer, but it eventually stopped responding with a “Connection Error” message. When I reloaded it, I was able to see both servers in the Server View, with a green checkbox.
I repeated these steps for pve1, and when I was finished, I had all 3 servers joined to the cluster:

At this point, I could log in to any of the Proxmox server management interfaces, and manage all of the servers in the cluster from any of them.
Troubleshooting – Bad IP
One mistake I made was with the IP address on pve3 in /etc/hosts. I had put in the wrong management IP address, and I got the following error when attempting to join the first server pve2 to the cluster:
TASK ERROR: fingerprint ‘fingerprint’ not verified, abort!

After some Googling, I found the mistake I had made, and fixed it in /etc/hosts. In order to pick up the change in the cluster settings, I edited /etc/pve/corosync.conf and incremented the config_version by 1. Once I did this, I restarted the services:
systemctl restart corosync.service
systemctl restart pve-cluster
After these restarted, I ran pvecm status to check the IP address was correct, and verified this in the GUI as well under Datacenter > Cluster > Join Information. I was then able to add the additional servers to the cluster without issue.
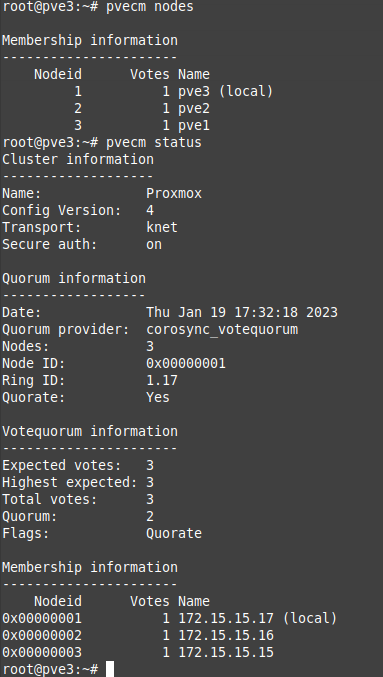
These commands may be helpful to check the status of the cluster in command line:
pvecm nodes
pvecm status
I got output similar to the following to give me details on the cluster:
Troubleshooting – Connecting to VM
Another issue I ran into after setting up the server was when logging into pve1, and creating and trying to console into a VM on pve2. I got the following error:
Error: Failed to run vncproxyTo fix this, I changed the /etc/hosts IP known to each server to the cluster management IP, and cleared the known_hosts for each using the following:
 ssh-keygen -f "/etc/ssh/ssh_known_hosts" -R "pve1"
 ssh-keygen -f "/etc/ssh/ssh_known_hosts" -R "pve2"
 ssh-keygen -f "/etc/ssh/ssh_known_hosts" -R "pve3"
Once I did this, I tested ssh SSH from pve1 into pve2 and pve3 as root without a password, to ensure the certificates worked. After I did this, I was able to console into VMs on different hosts properly.
Guest Migration Traffic
Thanks to /u/Montaro666 in this thread for reminding me that the VM guest migration traffic network should be explicitly set. By default, Proxmox VE uses the network in which cluster communication takes place to send the migration traffic. This is not optimal both because sensitive cluster traffic can be disrupted and this network may not have the best bandwidth available on the node. This article section has documentation on the subject.
To adjust this, I only needed to edit the /etc/pve/datacenter.cfg file, and add the following lines:
#Use public network for migrations
migration: secure,network=192.168.2.0/24
This setting was automatically synchronized to the other hosts in the cluster. I tested moving a guest VM between servers while running a constant ping, and there was not even a blip. You can see in the Proxmox status window during the migration that it is using the 10Gbps network for migration traffic:
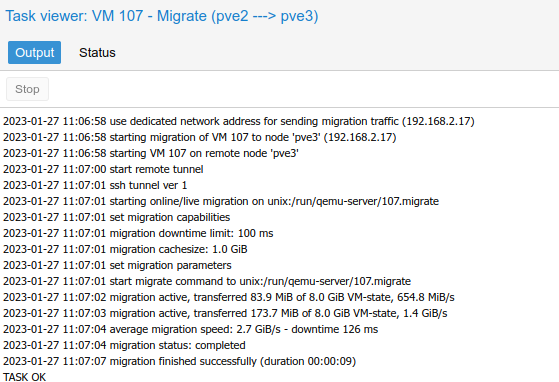
Unfortunately, I did get confirmation that the different CPU type or instruction set on my Dell R640 server will cause problems when live migrating guest VMs to/from it. When I tried, it migrated successfully in Proxmox, but the VM froze and required a forced restart. Therefore, any VMs migrating to/from this server, I will have to shut down the VM first to avoid problems.
Conclusion
With some preparation, joining separate Proxmox servers together into a cluster is fairly straightforward. In future articles I will go through setting up shared storage (Ceph), high-availability, and hyper-convergence with Proxmox.
Resources
I would recommend reviewing the official documentation, and watching the following videos before attempting to set up Proxmox clustering:
![]()