
Errata
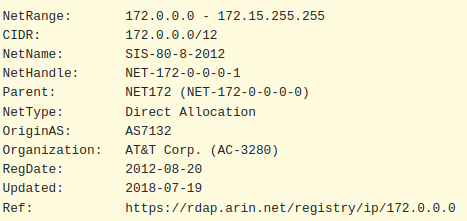
A kind soul on Reddit pointed out that the network ranges I used for the Ceph and Proxmox cluster networks are not actually in the reserved IP address ranges. The 172.15.0.0 range actually belongs to AT&T, as per WHOIS:
Although the networks don’t route at all, it’s still good practice to use the private ranges outlined in RFC 1918, so I will be adjusting them to the following:
PVE/Corosync Cluster Network - 172.16.15.0/24
Ceph Cluster Network - 172.16.16.0/24
VM Management Network - 192.168.2.0/24
DMZ Network - 192.168.99.0/24
I will update the article, however please notes that some of the screenshots may still have the previous values.
Introduction
In my previous articles, I set up Proxmox on multiple servers, migrated my virtual machines from VMware, and set up a Proxmox server cluster. The next step towards Proxmox Hyper-Converged Infrastructure was to set up shared storage. I already had my TrueNAS SCALE server connected to Proxmox via NFS for backup and large file storage, but I wanted the option for the virtual machine OS disks to be highly available, so they can be moved between server nodes seamlessly. This is where Ceph comes in.
What is Ceph?
Ceph is an open-source software defined storage platform. It aims for distributed operation without a single point of failure, excellent scalability, and is highly available. Ceph replicates data, making it fault-tolderant, self-healing, and reliable. For more information on Ceph, I’ve included some links in the Resources section below. I watched a number of videos from The Homelab Show and 45Drives Solutions which gave a great introduction to Ceph. Proxmox also has a great wiki article to prepare for setting up Ceph on Proxmox.
Hardware Considerations
The Ceph documentation has a good set of articles with hardware recommendations. Each of the Dell PowerEdge servers in my homelab have two multi-core processors each and 256GB of RAM. I was confident they can handle the workload of running Ceph, as well as the virtual machine compute.
Because my use case for Ceph was to store and run the OS files for the virtual machines, I wanted faster storage than spinning disks would provide, and decided I would need to go with solid state disks (SSD). This also provided better performance during data replication. I also wanted to ensure I had some power loss protection to prevent data corruption, in the event the server(s) lost power mid-write. While this is unlikely as I have a fairly hefty UPS, data integrity is important to me, especially since the storage will be mainly used for virtual machine OS. Many consumer grade SSDs do not have capacitors or power-loss protection circuits, which meant I had to look at enterprise grade SSDs.
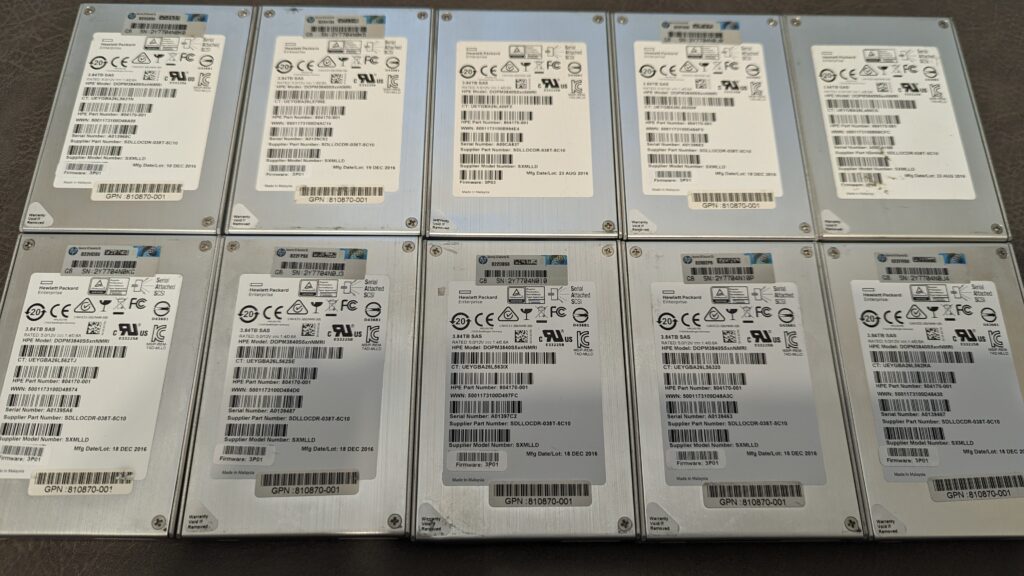
I was fortunate enough to get a good price on some gently used SSDs from the Reddit /r/homelabsales community. I purchased ten 3.84TB HP Enterprise 3.84TB SAS 2.5″ disks, which are actually Sandisk Optimus Max SSDs. More info on the specs are avaiable in this datasheet. The intention was to put three drives in each server, and have one as a hotspare/replacement if a drive fails.
The other consideration was networking. It is a common recommendation to use at least a 10Gbps speed network. Although it is possible to use Ceph over a 1Gbps connection, recovering from a failure would take hours rather than minutes to replicate the required data. It is also recommended to use dedicated network interfaces for the Ceph traffic, as the volume of traffic might interfere with other services if on the same network.
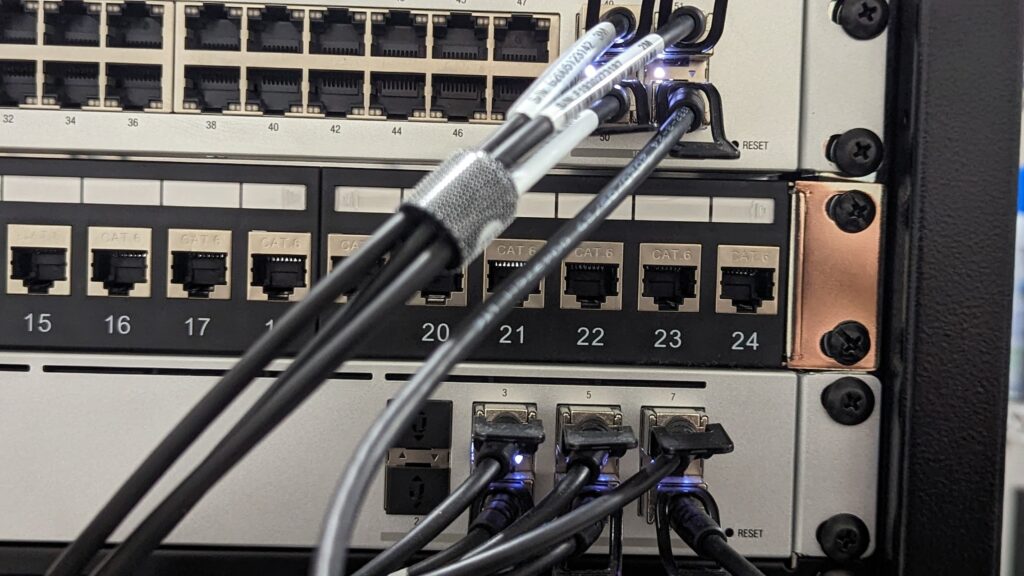
Fortunately, each of my servers has at least two 10Gbps SFP+ ports, so I dedicated one to the management/VM network, and one to Ceph. I had three extra SFP+ ports on my UniFi USW-Pro-48 switch, so I connected all three of the Ceph interfaces there, after making sure the switch could handle the switching load. According to the switch datasheet, it has a switching capacity of 88Gbps.
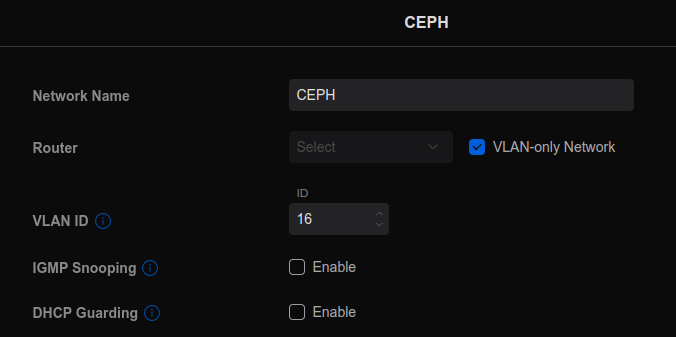
Once physically connected, I set up a VLAN in my Ubiquiti dashboard and assigned it to the SFP+ ports on the switch:
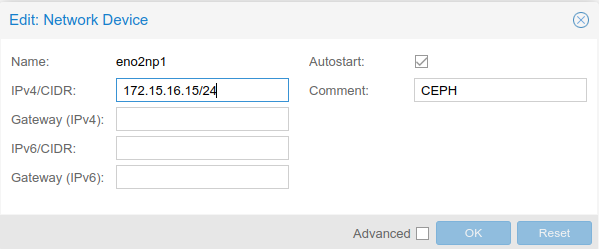
In Proxmox, I set up the SFP+ network interface on each server to the 172.16.16.0/24 network, assigning them each an IP address in that range:
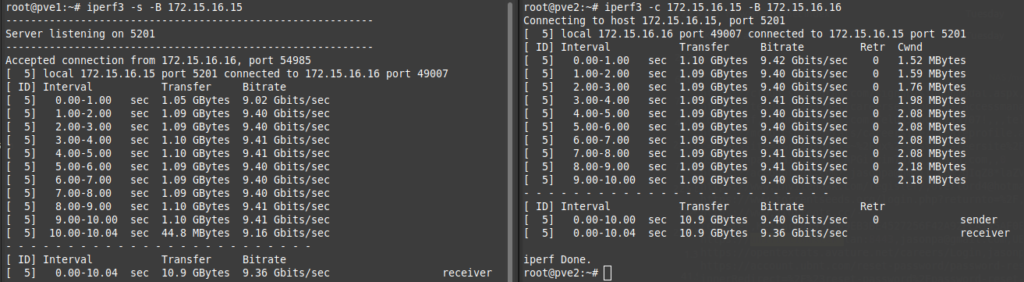
I ran a ping test between all three servers to ensure they could communicate with each other over the interface, and ran an iperf3 test on that network to ensure it was running at 10Gbps:
Ceph Installation and Networking Configuration
Proxmox installs without the Ceph components, so it must be installed and configured. Proxmox has instructions via both a web-based wizard, and command-line instructions for installing the required Ceph packages. Although I am not a fan of clickops, I opted to use the wizard for an easier setup experience, and to see how far I could get before having to dive into the CLI.
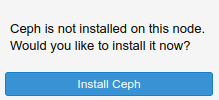
I clicked on the first node in my cluster, clicked on Ceph, and was prompted to install Ceph on the node:
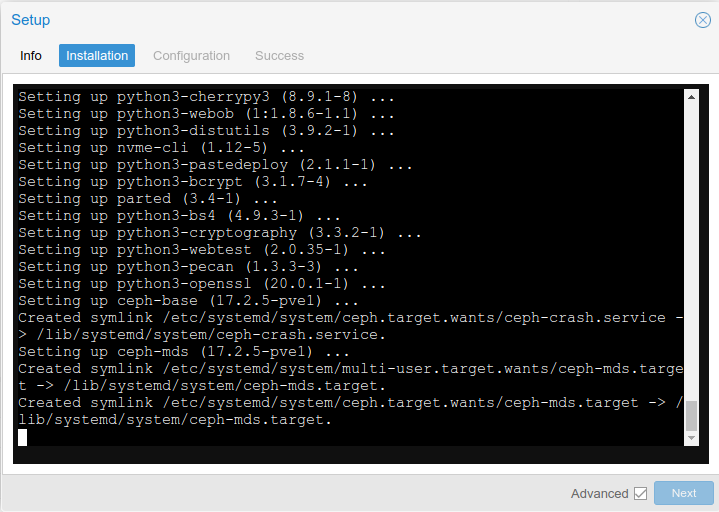
This brought up the setup wizard. I installed the latest version of Ceph (Quincy 17.2), which installed all of the required packages:
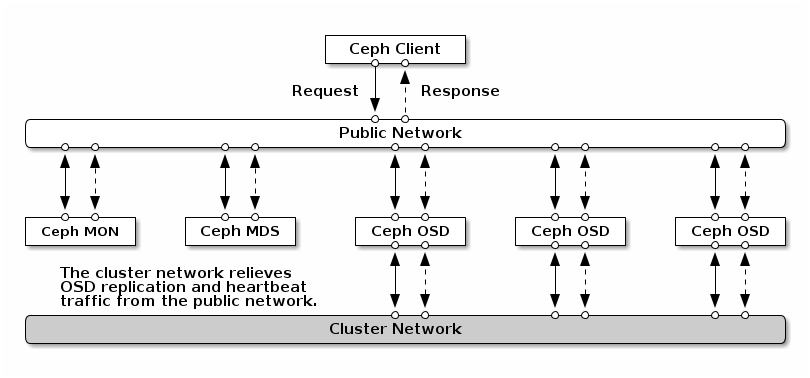
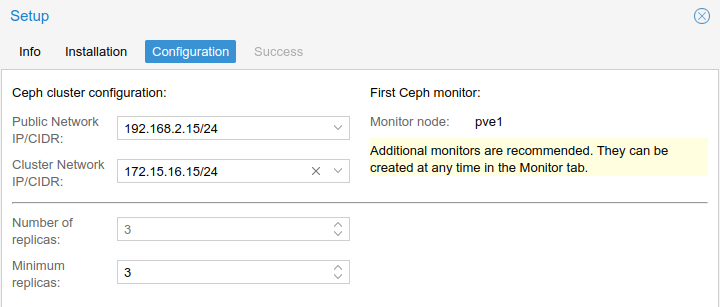
Once complete, I clicked Next, and entered the configuration information. One confusing thing is regarding the Ceph cluster network. Although I do have a separate 1Gbps network for the Proxmox cluster traffic (Corosync), the Ceph cluster network is completely different. It refers to a separate network for OSD replication and heartbeat traffic. The Ceph documentation explains this rather well, but this diagram also helps:
I chose to use the main management network (192.168.2.0/24) for the Public Network, so if I decided to access the Ceph storage from other machines, I would have an interface on the network to do so. I used the other 10Gbps network (172.16.16.0/24) for the Ceph cluster network, which would handle the backend Ceph replication and heartbeat traffic. Because data resiliency is prioritized over raw storage capacity, I set the minimum number of replicas to 3:
Because this is the first server with Ceph being installed, it also created a Ceph Monitor.
I repeated the package installation wizard on each server, but did not have to choose the configuration options again, as it was automatically distributed to all remaining cluster members through the Proxmox clustered configuration file system (pmxcfs).
Once complete, I got a HEALTH_WARN status from each server, as there were no Ceph Object Storage Daemon (OSD) set up yet.
Adding Additional Ceph Monitors and Managers
A Ceph cluster must contain a minimum of three running monitors in order to be both redundant and highly-available. Production Ceph clusters typically provision a minimum of three Ceph Monitor daemons to ensure availability, should a monitor instance crash.
Once Ceph was initialized, I went into each server and added a Ceph Monitor and Ceph Manager for redundancy. This was done just by clicking the Create button next to each object type. Once complete, it looked like this:
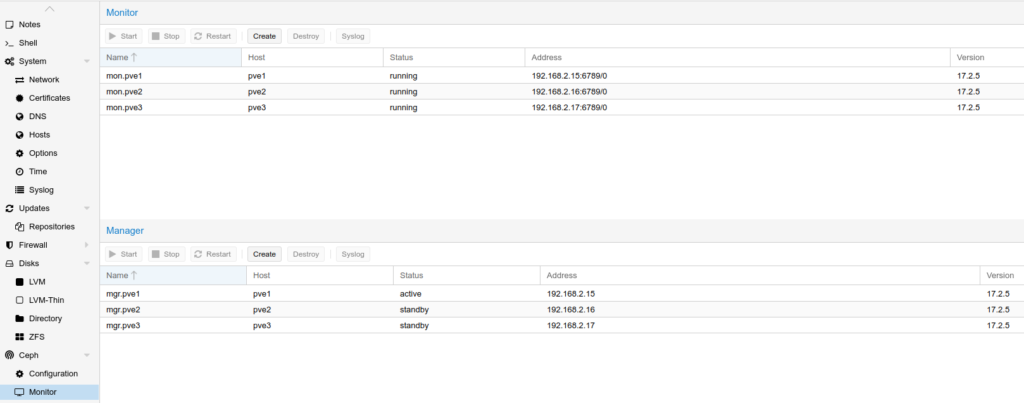
The Ceph Manager daemon (ceph-mgr) runs alongside monitor daemons, to provide additional monitoring and interfaces to external monitoring and management systems. As you can see in the above screenshot, the additional managers are on standby.
Preparing the Disks
Now that Ceph was installed on all of the Proxmox servers, I added the physical disks to the front 2.5″ bays of the Dell servers. Because these were used disks, I wanted to make sure they were completely cleared of any previous filesystems, partitions, or boot sector flags. Ceph includes a tool ceph-volume to “zap” all traces of previous usage, using the following syntax:
ceph-volume lvm zap /dev/sd[X] --destroyI added the disks individually, which did show up in the Dell IDRAC and in Proxmox as Sandisk SSDs:

The “zap” was quite quick, taking only a few seconds:

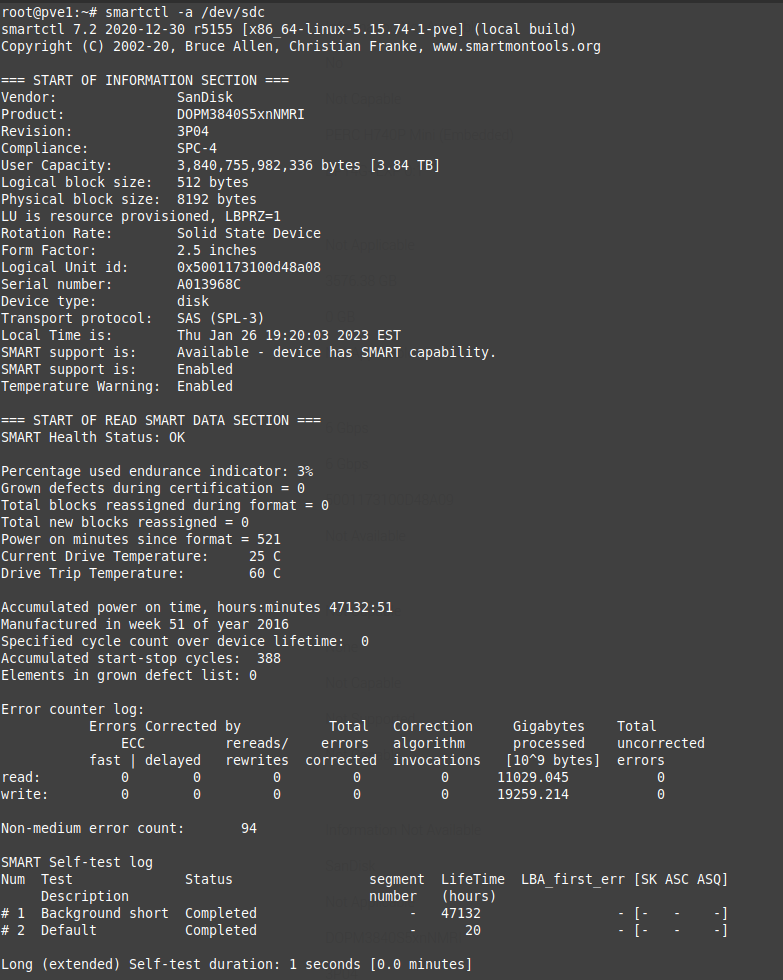
I ran some smartctl commands and a short test to take a look at any warning signs of a drive failing:
smartctl -i /dev/sdc
smartctl -t short -a /dev/sdc
smartctl -a /dev/sdc
From reviewing the test results, Only 3% of the endurance had been used, no errors, and about 20TB of data written, so the drives were in good shape:
I repeated the steps for each drive, adding three physical drives to each server.
Creating the Ceph Object Storage Daemons (OSD)
Once all of the disks were installed and functional, I created an OSD for each physical disk I would be adding to Ceph.
For each Proxmox node in the cluster, I went to the Node > Ceph > OSD and clicked Create: OSD. I selected one of the Sandisk SSDs, left the defaults, and clicked Create, then waited while the OSD was created. I repeated the process on each server until all 9 disks were added. After reloading the page, I could see all 9 disks as below:
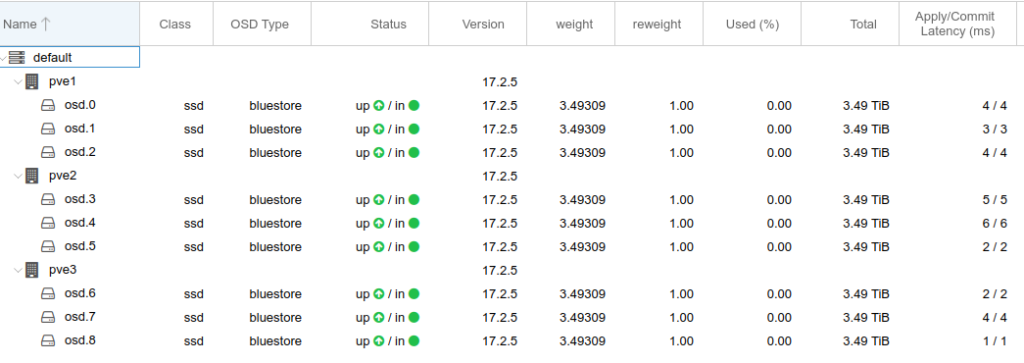
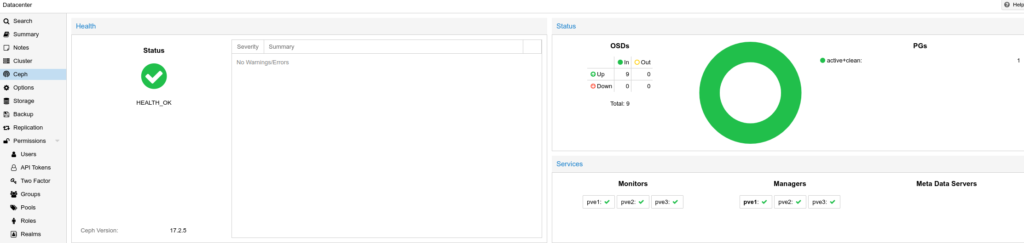
At this point, going to Datacenter > Ceph showed good health and instead of a HEALTH_WARN I got a HEALTH_OK status:
Creating a Ceph Pool
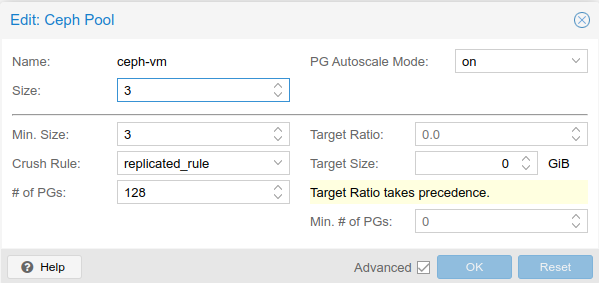
Now that there was a green light with the Ceph configuration, I started configuring the storage space for use by creating a Ceph Pool. Pools are logical partitions used to store objects. Because I wanted to use Ceph to store the virtual machine OS drives, and wanted high availability, I increased the minimum replica value to 3, but left all the other values as default:
Once the pool was created, I could see the storage available under each Proxmox node:
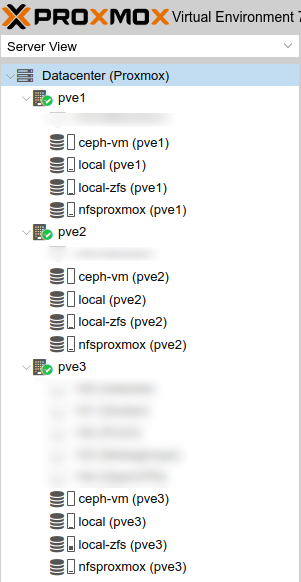
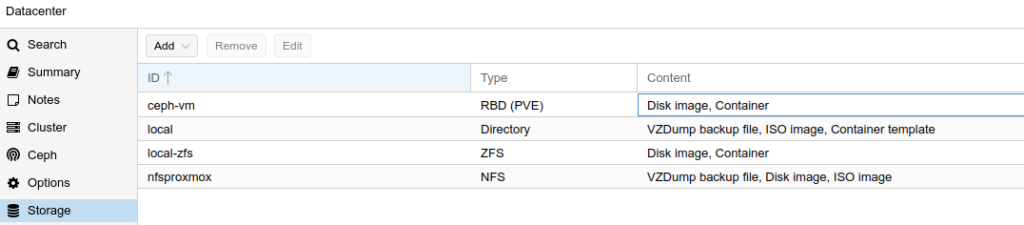
Looking under Datacenter > Storage, I could see the ceph-vm volume available as a RADOS Block Device – RBD (PVE) type:
Testing Ceph
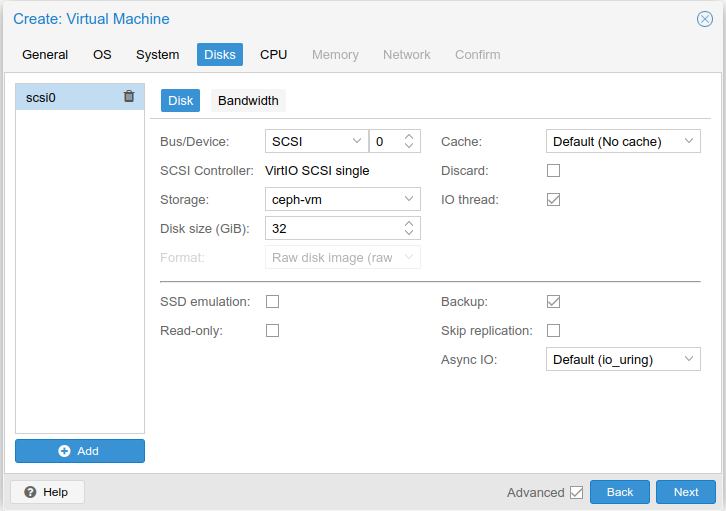
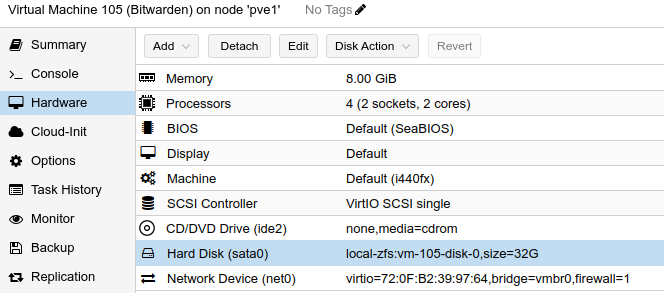
To test Ceph, I installed a new Debian virtual machine on the pve1 Proxmox server, using the ceph-vm storage pool to store the OS disk:
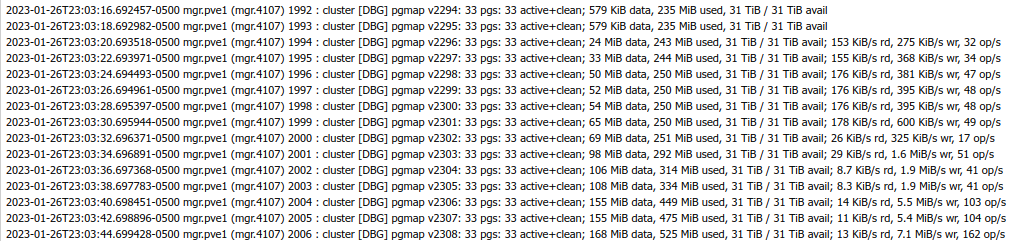
Once the installer started writing changes to disk, I started to see activity in the Ceph logs:
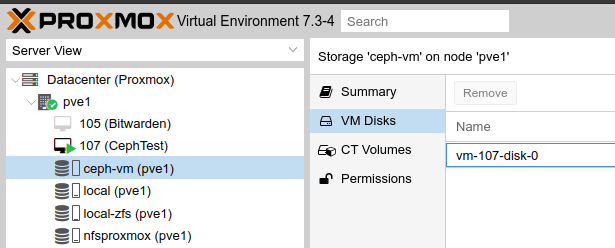
I could also see the space being allocated, and the VM disk being stored under ceph-vm > VM Disks, replicated to each server:
Benchmarking Ceph
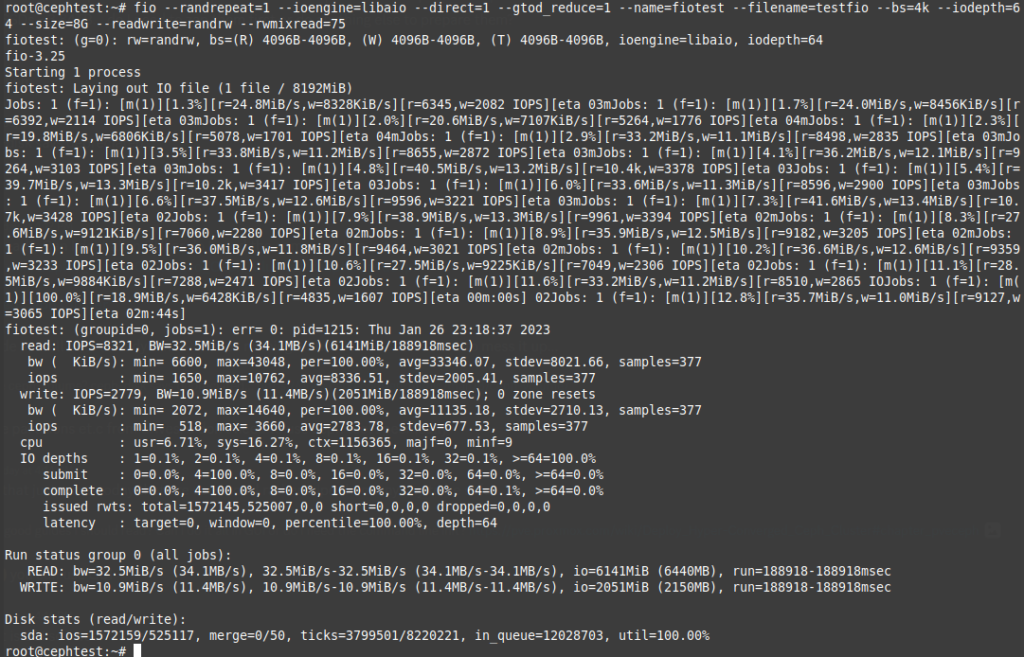
The Linux VM booted up properly after install, and I installed a few packages including fio, for a quick disk benchmark test. I ran the following to do a random read/write operation test:
fio --randrepeat=1 --ioengine=libaio --direct=1 --gtod_reduce=1 --name=fiotest --filename=testfio --bs=4k --iodepth=64 --size=8G --readwrite=randrw --rwmixread=75The 8GB test took 2m44s to complete, and reported the following:
Migrating VMs to Ceph Storage
Note: I will be running more tests and optimizations and checking on my setup before I fully migrate my running virtual machines to Ceph. Please let me know in the comments if there are any changes you would recommend.
I tested migrating a virtual machine disk to the Ceph storage cluster. I clicked on a VM, went to Hardware, clicked on the Hard Disk, and under the Disk Action menu, chose Move Storage:
This brought up a menu which allows choosing the Target Storage, in this case ceph-vm:

By default, the source disk will be added as an “unused disk” for safety, and to allow rollback. If this is not needed, the “Delete Source” option can be checked to delete it instead.
Troubleshooting
At one point during the installation, I did need to correct the Public and Cluster network settings. While it is possible to do this by editing the /etc/pve/ceph.conf file, I chose to uninstall Ceph and reinstall from scratch. This guide was helpful in manually uninstalling Ceph and starting over.
Conclusion
In this article, I went through the steps to set up Ceph on Proxmox with the aim of moving towards Hyper-Converged Infrastructure with High Availability. With the newest versions of Proxmox 7.3-4 and Ceph 17.2.5 (Quincy), it was possible to install and configure Ceph completely within the Web UI.
Resources
- Florian – Ceph Storage Calculator
- The Homelab Show – Episode 65 – Ceph Storage with Special Guest 45 Drives
- 45Drives – Intro to Ceph Clustering – Part 1 – When to Consider It
- 45Drives – Intro to Ceph Clustering – Part 2 – How Ceph Works
- 45Drives – Intro to Ceph Clustering – Part 3 – Data Security
- 45Drives – Intro to Ceph Clustering – Part 4 – Self Balancing and Self Healing
- Proxmox Guide – Deploy Hyper-Converged Ceph Cluster
- Ceph Documentation – Hardware Recommendations
- Reddit /r/ceph Discord Join Link
- How to completely remove delete or reinstall Ceph and its configuration from Proxmox VE PVE
![]()