Introduction
Recently, I’ve been doing more of my coding in Visual Studio Code, rather than using vim in a terminal. I found it tedious having to switch between multiple terminal windows, or having to save and close my code, then run it in the same window.
At work, I am using a Windows laptop to connect to multiple services, applications, and VPNs, but I still wanted a full Linux environment to work with, as I am working on numerous Linux machines hosted in AWS. This method was also helpful at home to be able to spin up a Linux server in my lab for some testing. I could connect to the test server, code and test on the remote server, then delete it or save state as needed.
I have also been getting more familiar with using git for version control, and saving my code in Gitlab or Github. VS Code has some good integration for this, and even handling it manually in a terminal, I can see the changes reflected in the filesystem.
Summary
This guide will install a desktop Linux environment in a virtual machine on Windows, to allow for the capability to use the GUI, however the majority of the time the machine will run headless and will be accessed via SSH. Linux and Mac users may be able to run all of the software natively, however there are some advantages for setting up a separate virtual environment to code and test with. For example:
- Being able to manage multiple VPNs at once. You can be logged one VPN on Windows, and use another on Linux with the virtual machine.
- Having a fully functional Linux machine for coding and running tests as closely as possible to what will be deployed.
- Having a fully functional Linux desktop environment for using GUI based tools when needed.
- While Windows Subsystem for Linux is becoming more functional, there are issues with WSL2 when using some VPNs that require workarounds.
- Easy to backup the VM files for disaster recovery, in the event your computer needs to be repaired, upgraded or reimaged.
Prerequisites
Disable Microsoft Hyper-V
To avoid conflicts with VirtualBox, Hyper-V should be disabled. In many cases, having Hyper-V enabled will prevent VMs from being able to be created or run using VirtualBox.
See the following Microsoft article for steps on disabling Hyper-V via GUI or PowerShell. Reboot the system afterwards to ensure the change takes effect.
Install VirtualBox
Download and install the latest version of VirtualBox. As of November 2021, the most recent version is 6.1.30. Avoid version 6.1.28, as there are known issues preventing VMs from starting up. Review the Changelog for details, and if you run into issues, revert to a previous version.
Once installed, you may want to pin the application to your taskbar, as starting the VM will be one of the first things you do after logging in.
Install Visual Studio Code
Download the latest system installer from the website here. Choose the 64-bit installer for your OS.
We will add extensions and configure VS Code later.
Download an ISO of your favorite Linux distribution
For this guide, we recommend using a desktop Linux environment, however if you are comfortable and confident you won’t need it, you can use a more lightweight, command-line only install. For this guide, we are using the latest version of Ubuntu Desktop, which is version 21.10. This version should be able to install the majority of tools you will need without needing to adjust repositories.
Download and install FileZilla
FileZilla is a flexible Windows utility for accessing files over FTP, SSH, etc. This can be used to quickly transfer files to/from the virtual machine when needed. FileZille can be downloaded and installed manually at this link.
Set up Linux within VirtualBox
Create a Virtual Machine
- Within VirtualBox, go to Machine > New. Give the virtual machine a name (e.g. Ubuntu). Adjust the Type to Linux, and the Version to Ubuntu (64-bit), then click Next.
- Set the memory size, depending on the amount of memory your local computer has. 8GB (8192MB) should be plenty.
- Create a Virtual Hard Disk.
- If you will only be using this machine with VirtualBox, the default VDI file type is fine. If you may use this machine with VMware software, a VMDK file may be preferable. For this guide, we will use the default option VDI. Click Next.
- Select Dynamically Allocated for storage, unless you would like to reserve a fixed amount of space on the disk. Click Next.
- Select the location for the storage file, and set the maximum amount of space for the virtual machine to take up. For this guide, a 32GB maximum disk size is recommended.
- Click Create.
- Select the created virtual machine and click Settings. Under Storage Devices, under Controller: IDE, there will be an icon of a CD, which represents the optical drive.
- On the right side under Attributes, next to the IDE drive information, click this icon
 to drop down the options to choose/create a virtual disk.
 - Click Add, find the Ubuntu ISO you downloaded, and choose it. This should mount the image as a boot device. Click OK.
Install Ubuntu Desktop
- Click the green Start arrow to boot the virtual machine in GUI mode. This should open a separate window. When prompted, choose “Ubuntu” for the boot option. This will load the GUI installer.
- Wait while the installer loads. You may have a black screen with a spinning mouse icon for a few moments as it starts up. The install menu should come up on its own.
- Select the language (English), and select “Install Ubuntu”.
- Adjust the keyboard layout if needed, and click “Continue”.
- Select “Minimal Installation”, and check the boxes for “Download updates while installing Ubuntu” and “Install third-party software for graphics and Wi-Fi hardware…”. Other graphical utilities can be installed later if needed. Click “Continue”.
- Click “Install Now” when prompted. The warning for erasing the disk refers to the disk inside the virtual machine, so there is no risk to your Windows install. Click “Continue” when prompted to write the changes to disks.
- Select the timezone. For this guide we are using Toronto (EST). Click “Continue”.
- Complete the “Who are you” section:
- Add your full name to the “Your Name” field. For example, “John Smith”.
- For the computer name, it is recommended to abbreviate your username and add -vm or -virtualbox, for easy identity. For example, “jsmith-virtualbox”.
- For the username, use an abbreviation of your name. For example, “jsmith”
- Enter a password you will remember, as this password will not be rotated, and once set up, you will log in automatically with your SSH key.
- Leave the setting “Require my password to log in” for security purposes.
- Click “Continue”.
- Wait while the system installs. It will take 5-10 minutes to download and install all of the required packages. Reboot the Ubuntu machine when prompted.
- Verify under Devices > Optical Drives that the ISO has been unmounted, then press Enter. The system should reboot into the graphical interface and prompt you to log in.
- Log in when prompted, as there are a few configuration settings we will need to make inside the graphical interface.
Configure SSH Access
In order to connect to the virtual machine with Visual Studio Code and other applications, you will need to set up network connectivity for SSH.
Inside the Ubuntu GUI, click the ![]() menu in the bottom left and search for “Terminal” to bring up a command line. We can do most of the work through this. Type the following commands:
menu in the bottom left and search for “Terminal” to bring up a command line. We can do most of the work through this. Type the following commands:
- sudo apt-update && sudo apt -y upgrade – This will update all of the current software on the system. Another reboot may be needed before proceeding, to ensure all of the latest firmware is used.
- sudo apt install -y openssh-server – This will install SSH for us to be able to connect with.
Some optional packages to install which may be helpful later. This can be installed now, or later via SSH:
- HashiCorp Terraform – used for building Infrastructure as Code. View this link for steps and commands to install.
- HashiCorp Packer – used for building automated machine images. View this link for steps and commands to install.
- Red Hat Ansible – A powerful automation tool. View this link for steps and commands to install.
- Docker Engine – For containerization. View this link for steps and commands to install.
- AWS CLI – For interacting with AWS in command line. View this link for steps and commands to install. Ensure you install AWS CLI v2 manually, as the version through apt is old.
- Screen or TMux – Ability to attach/detach terminal sessions. To install both, run sudo apt install -y screen tmux.
- vim and nano – Powerful Terminal text editors. To install both, run sudo apt install -y vim nano.
- net-tools and traceroute – allows for using network diagnostics. To install, run sudo apt install -y net-tools traceroute.
Now that the SSH server is running, you will need to generate a new key pair for connecting to the machine via SSH:
- Run the following command: ssh-keygen -t rsa -b 4096 -C “[email protected]”.
- Click Enter to save the default filename to the default location in ~/.ssh, or specify a unique filename.
- Click Enter twice when prompted for a passphrase, so no passphrase is used.
- You should see output similar to the following:
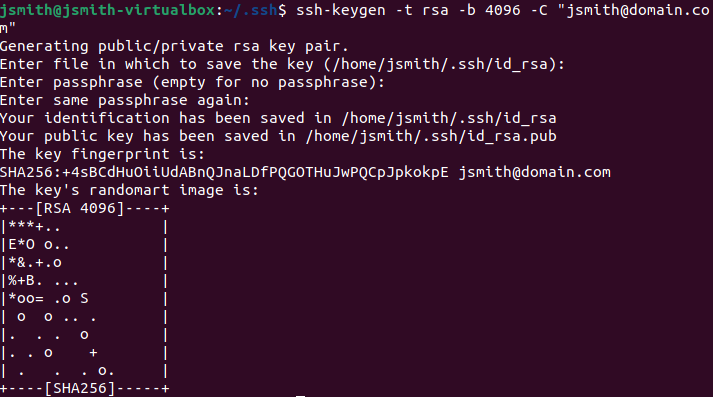
- We will retrieve the private and public keys from the machine later to make it easier to log in remotely.
- Run the following command to append the new public key to the “Authorized Keys” file for automatic login using the private key: cat ~/.ssh/id_rsa.pub >> ~/.ssh/authorized_keys
- Click on the icons in the top right corner, and select “Power Off”. You can explore the graphical interface later, but for the rest of this guide, we will run the virtual machine headless. Alternatively, in Virtualbox you can select Machine > Detach GUI and skip the reboot.
- In VirtualBox, go to Machine > Start > Headless Start, to run the virtual machine without the additional GUI window. This is the typical way to start the virtual machine.
Configure Port Forwarding for SSH
Because the virtual machine runs on a virtual network adapter using Network Address Translation, you will need to set up a unique port on your local machine, and forward that to port 22 on the virtual machine. By default, the IP address inside the virtual machine is 10.0.2.15, so we will set up a rule to port forward SSH requests on port 6789 to port 22 on the virtual machine.
- Click Machine > Settings > Network. Under Adapter 1, click Advanced > Port Forwarding.
- Click the
 Add Rule button on the right side. Create a rule with the following settings:

- Name: “Allow SSH”
- Protocol: TCP
- Host IP: 127.0.0.1
- Host Port: 6789
- Guest IP: 10.0.2.15
- Guest Port: 22
Click OK > OK to save the network settings.
Download the SSH Keys from the Virtual Machine
- Launch FileZilla, and enter the values in the below screenshot. Use the appropriate username and password, and click “Quickconnect”:

- You may be prompted to verify or accept the SSH keys. Once connected you should see the local Windows filesystem on the left side, and the Linux filesystem /home/username directory on the right side.
- On the left side column, navigate to C:\Users\username\.ssh\ – if this folder is missing, create it.
- On the right side column, navigate to /home/username/.ssh/ – this folder should already exist.
- Drag the id_rsa and id_rsa.pub keys from the right column to the left column, to copy the private and public SSH keys to your local computer.
- Close Filezilla.
Configure Visual Studio Code
Install and Configure Remote SSH Extension
- Open Visual Studio Code, and press Ctrl+Shift+X to bring up the Extensions window, or click on this icon on the left hand menu:

- Search for and install the Remote – SSH and Remote – SSH: Editing Configuration Files extensions from Microsoft. Other extensions will be installed while logged into the virtual machine.
- In the bottom left of the window, click on this icon
 to open a remote window.
 - For the “Enter SSH Connection Command” prompt, enter the following: ssh [email protected] -p 6789 -i C:\users\username\.ssh\id_rsa.
- This specifies the port to connect as 6789 which will forward to port 22 on the virtual machine, which is running SSH.
- This also specifies to use the private SSH key to authenticate with the remote server.
- For the “Select SSH configuration file to update” give the directory to the ssh directory where the keys are stored. For example: C:\users\jsmith\.ssh\config
- A “Host Added!” message should pop up in the bottom left corner. Click “Connect”.
- You may be prompted to accept the fingerprint, but you should not be prompted for a password, as the private SSH key will be used.
- You will see the localhost address added at the bottom left to confirm you are connected to the virtual machine:

Customize Visual Studio Code
Now that you are connected to the remote host, you can add folders, and custom extensions to use on the remote host.
- Press Ctrl+Shift+E to open the Explorer, or click on this icon on the left hand menu:

- Click “Open Folder” and enter the home directory for the remote user. For example: /home/jsmith.
- This should add the full home directory on the left side to work with.
Add Custom Extensions
Custom extensions will help with syntax, indentation, text coloring, making it easier to code.
- Press Ctrl+Shift+X to bring up the Extensions window, or click on this icon on the left hand menu:
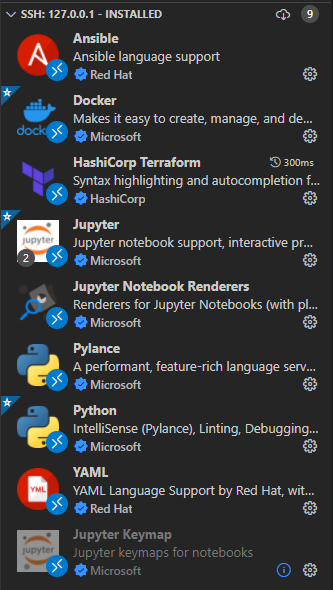
- There should be a new section for “SSH: 127.0.0.1 – Installed”, which will show the extensions installed for use in the virtual machine.
- Search the Marketplace and install extensions. The following are recommended – be sure to install the one from the proper company:
- Docker – Microsoft
- Hashicorp Terraform – Hashicorp
- Ansible – Red Hat
- Python – Microsoft
- When you’re done, you should see an installed list of extensions and dependencies similar to the following:
At this point you should have a fully functional Visual Studio code environment that should automatically connect to the virtual machine whenever you open the program. If you restart Visual Studio code, it should automatically connect and you will see this in the bottom left hand corner of the program: ![]()
Helpful Tips
Terminal Window
- Using Terminal > New Terminal should bring up a command line on the remote virtual machine. This will allow you to quickly run commands or test code, install packages, or SSH to other machines for administration.
- The right side of this window has a maximize button, which can quickly give you more space while reviewing command output, rather than closing code or moving windows:

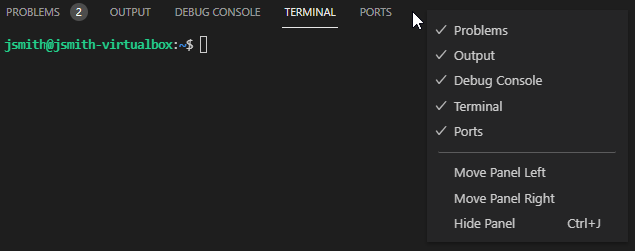
- You can right click the panel and move it to the right or left side, rather than keeping it on the bottom. This can be handy if you have a monitor set up vertically:
- The “Play” button
 in the top right of the code window can quickly execute your code in the terminal, and you can choose the type of execution in the terminal on the right side. For example, Bash vs Python:
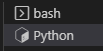
Version Control
- Review how to connect VS Code to your code repository, such as Github or Gitlab. Some resources:
![]()
Hey!
how to do this when the VM is running on another machine.
we have a windows lab-pc on the lab and it has ubuntu VM. I want to access it from VSCode from my laptop. is that possible?
Use the SSH extension in VS Code to connect your IDE to code on the remote server. You will need the ability to SSH into the Ubuntu VM, so however that is virtualized, you may need to port forward the SSH access.
https://code.visualstudio.com/docs/remote/ssh