
Introduction
When working with public cloud providers such as AWS, Azure, or GCP, to create a new virtual machine, this is typically done through the web console. For AWS, you can create a new EC2 instance with pre-defined configuration with just a few clicks. With Google Cloud, you can create VM instance in Google Compute Engine through the web console in a similar way. These platforms also have a way to define creating the machine through their own command line tools, such as AWS Command Line Interface, AWS CloudFormation; or Google’s gcloud CLI as part of the Google Cloud SDK. However, using the specific platform’s tools mean you will need to install them and learn their specific commands. It also means that if you wanted to port your machines between cloud providers, you would potentially have to rewrite a bunch of commands.
One of the advantages of Hashicorp Terraform is providing an open-source infrastructure as code tool that can be used to manage hundreds of cloud services. All of the code is written in Hashicorp Configuration Language (HCL), and modules are used to interact with different cloud services. This provides a consistent method and experience for building Infrastructure as Code.
Terraform also works with on-premise providers such as VMware vSphere.
The goal of this project is to automate building a virtual machine on VMware vSphere using Terraform. In this example, I will use the Debian 11 “Bullseye” VM template I created using Packer, for which the scripts are available on Github here. This previous blog post goes through the steps and build process and provides a more detailed explanation.
Utilization Steps
See this Github article for steps on cloning a repository. If you clone the Github repo, you’ll see a number of files in the vmware-base directory.
The terraform-vars.sanitized file must be renamed to terraform.tfvars, and all of the values entered. This should be the only file that needs editing, and there are comments for each of the lines to help with the values.
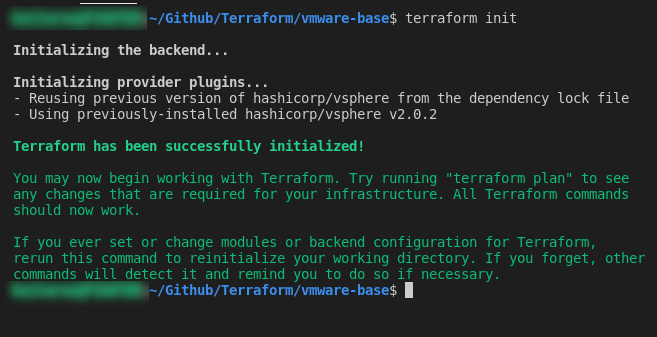
If you then run “terraform init“, it will initialize the directory and download any of the provider plugins needed:
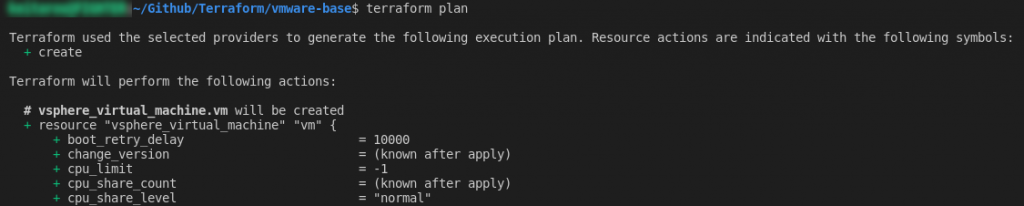
If you then run “terraform plan“, it will create and display an execution plan to preview the changes Terraform plans to make to your infrastructure. When adding resources, most of the text should have a green + next to it, indicating a creation/addition:
If the plan completes without error, you can proceed with running “terraform apply” to proceed with executing the actions. The command should return the same action plan summary, and prompt you to type “yes” to proceed with creation. Once done, you can wait while the virtual machine is created:
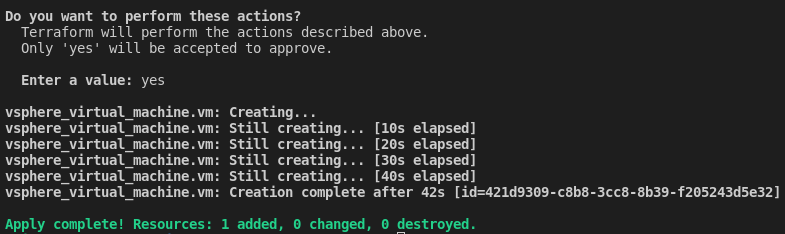
Once the “terraform apply” completes, you can check in vCenter and confirm the machine is present.
Verification Steps
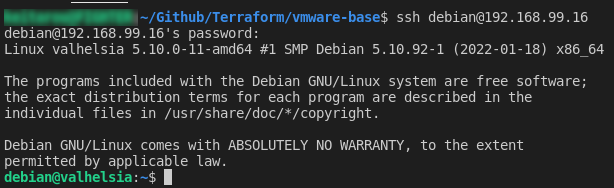
Once the virtual machine is created, as part of the Terraform script, the machine is customized to the specified hostname, domain and IP address as set in the terraform.tfvars file. For thie example, the Debian 11 template was set up the user “debian” with the password “debian”, and a generated SSH key to ensure the SSH service started on boot. You can test SSH connectivity to the newly created machine:
Conclusion and Next Steps
Now that we have a base virtual machine up and running, further customization can be done using tools such as Ansible.
![]()