Introduction
During some work with Lambda functions in AWS, I needed to set up a virtual environment in Python to be able to ensure the code I was using had the correct libraries and dependencies. During this, I found a few ways to accomplish the task that I thought would be valuable to document and share.
What is a Python Virtual Environment?
This page from the Python.org documentation explains further, but the first few paragraphs are key.
Python applications will often use packages and modules that don’t come as part of the standard library. Applications will sometimes need a specific version of a library, because the application may require that a particular bug has been fixed or the application may be written using an obsolete version of the library’s interface.
This means it may not be possible for one Python installation to meet the requirements of every application. If application A needs version 1.0 of a particular module but application B needs version 2.0, then the requirements are in conflict and installing either version 1.0 or 2.0 will leave one application unable to run.
The solution for this problem is to create a virtual environment, a self-contained directory tree that contains a Python installation for a particular version of Python, plus a number of additional packages.
To summarize, a Python virtual environment allows you to package the specific version of libraries needed for your code to run. This eliminates the “it works on my laptop” problem, where you may have specific versions of libraries installed, but someone else may have different versions.
Prerequisites
To go through the steps in this article, you will need to have some packages installed. I would recommend installing the latest version of Python 3. This can be installed using brew on MacOS, or yum on CentOS/RedHat. In my testing using Ubuntu or Debian, the packages can be installed using the following commands:
sudo apt update && sudo apt upgrade
sudo apt install -y software-properties-common
sudo apt install -y python3 python3-dev python3-venv
You may need to change the link from /usr/bin/python3 to point to the version you want to use, but if you explicitly call python3.9, it should return the version:

Creating a Python Virtual Environment – Classic Method
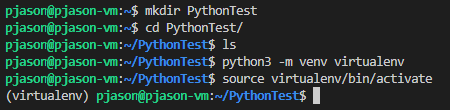
Going through the Python documentation, you can use the venv command to create a lightweight virtual environment. Run the following command to create a new Python virtual environment, with the folder in your current directory:
python -m venv <virtual-environment-name>Once this is done, you can activate the virtual environment using this command:
source <virtual-environment-name>/bin/activateIf successful, you should see the environment name at the front of your terminal prompt:
Once you are inside the virtual environment, you can use pip3 to install all of the required libraries to their specific versions. More on this below.
Using pip to install libraries and generate a requirements file
According to the Python documentation, the pip program is the “preferred installer program” for Python projects. It is included by default with Python 3.4 and higher. Since this version, venv defaults to installing pip into all created virtual environments.
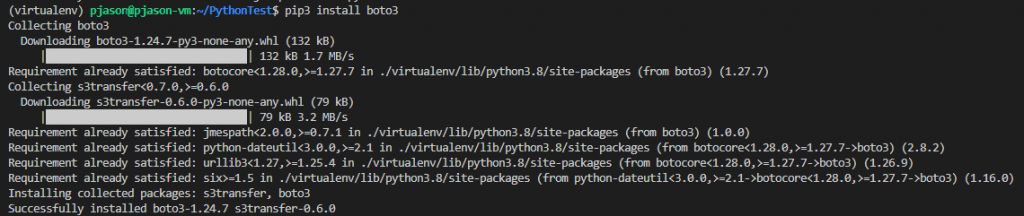
Once you are inside the virtual environment, you can manually install packages using pip. For example:
pip3 install wheel botocore boto3 datetime csThe libraries will be installed to the latest version and you will see output such as this:
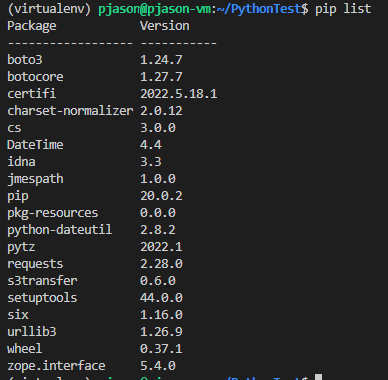
Use the command pip list to check the installed versions of libraries in the environment:
Once you have all of the libraries installed to the correct version, you can “freeze” this environment, and output a requirements.txt file with the libraries at their specific version. This can be provided in your code repository so another person can replicate the same environment with the same libraries at the same version.
pip freeze > requirements.txt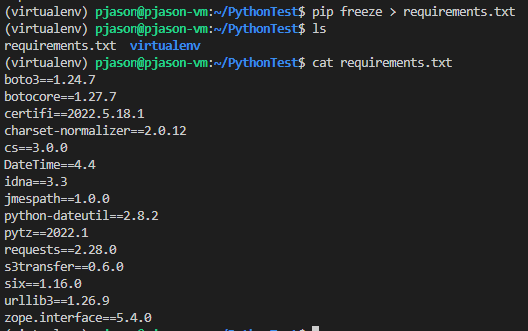
To use the requirements file on a new environment, you can run the following to install all of the libraries at once using the file:
pip install -r requirements.txtOnce you are finished with the virtual environment, type deactivate to exit the environment. You will see the (virtualenv) disappear from your command prompt:

To clean up the virtual environment, you can manually delete the directory in ~/.virtualenvs that was created:

The next generation – using pipenv to manage virtual environments and requirements
With the above steps, it’s quite manual to create the virtual environment, activate it, install the libraries using a requirements.txt file or pip directly, freeze the requirements, and deactivate.
Pipenv has become a more common way of managing project dependencies. Instead of having a requirements.txt file in the project, and managing the virtual environment separately, we can create a Pipfile to handle this automatically.
First, ensure pipenv is installed on the machine you are using. This can be done with pip, brew, or your built in package manager. For my environment on Ubuntu Linux, I would just run sudo apt install pipenv.
Once pipenv is installed, it needs to be invoked to build a virtual environment by running pipenv install. This will create a Pipfile and Pipfile.lock file. If you already have a requirements.txt file from the previous steps, it will detect this and convert it into a Pipfile:
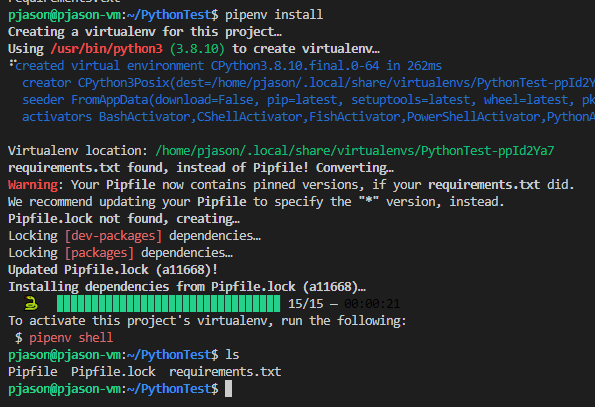
So in one command, we’ve built a virtual environment, loaded all of the libraries, and created the files (Pipefile, Pipfile.lock) that others can use to build a virtual environment to use with the same versions.
Once you’re finished with the virtual environment, run pipenv --rm to remove it. The default locations for the virtual environment files is in ~/.virtualenvs and ~/.local/share/virtualenvs.
Note the Pipfile and Pipfile.lock will not be deleted, and can be kept to reuse as part of your code base.
Other Options
There are a number of other options for creating and managing virtual environments and library dependencies. They are worth looking into, and all have their pros and cons.
At some point it may make more sense to just containerize with Docker and use that instead.
Conclusion
Virtual environments are an important consideration when writing and collaborating on Python code. There are multiple ways to set them up, but it is important to understand why and when to use them.
References
- FreeCodeCamp – How to set up virtual environments in Python
- Python – Pipenv and Virtual Environments
- Why pipenv over venv for Python projects?
- XKCD Comic 1987
- Which Python Package Manager Should You Use?
![]()
One thought on “Using Virtual Environments with Python”