
Introduction
In my previous article, I upgraded my hyperconverged Proxmox cluster in my homelab from Proxmox VE 7.4 to 8.1:
As recommended by the Proxmox upgrade guide, we purposefully left Ceph on Quincy, as it was recommended to upgrade to Reef separately. This article will go through the steps to safely upgrade all of the Ceph cluster nodes to the latest version of Ceph Reef.
Ceph Reef is the 18th stable release of Ceph. This blog article goes through some of the major changes and outlines the upgrade steps.
The Proxmox Wiki has a Ceph Quincy to Reef article with steps we can follow. To be clear, we will be going through the non-cephadm cluster steps.
Check Prerequisites

The upgrade requires all nodes to be on the latest Proxmox VE 8.0 or higher, and Ceph on version Quincy (17.2.6) or higher. Be sure to check both versions on each node to ensure they are up to date. If you followed the previous article to upgrade Proxmox to 8.1, you should be at a supported version.
You should also ensure you are using Bluestore OSD type, as the Filestore OSD is deprecated.
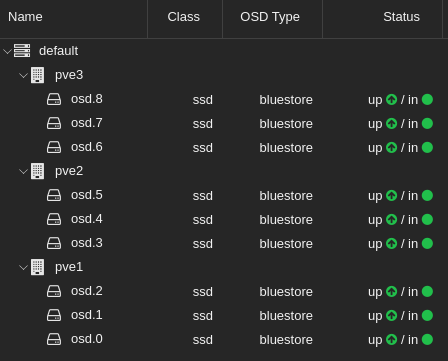
You can check what all your OSDs are using in the WebUI by clicking on a Proxmox Node > Ceph > OSD > OSD Type, or by running the following in command line:
ceph osd metadata | grep osd_objectstoreIf the cluster is running in production, you may want to migrate workloads from each Proxmox node while you upgrade Ceph, and put the node into HA Maintenance Mode. If you are already up to date, the upgrade from Ceph Quincy to Reef should not require a reboot, but it will require multiple service restarts, which may affect availability.
Enable msgrv2 protocol and confirm monitors are updated
The Ceph Messenger v2 protocol, or msgr2, has a number of updated features that are recommended to use, including a secure mode that encrypts all data passing over the network, improved encapsulation of authentication payloads, and improved feature advertisement and negotiation.
The new v2 protocol binds to port 3300, while also binding to the old default port 6789 for the legacy v1 protocol. You can see if you are running the v2 protocol already by running the ceph mon stat or ceph mon dump command:
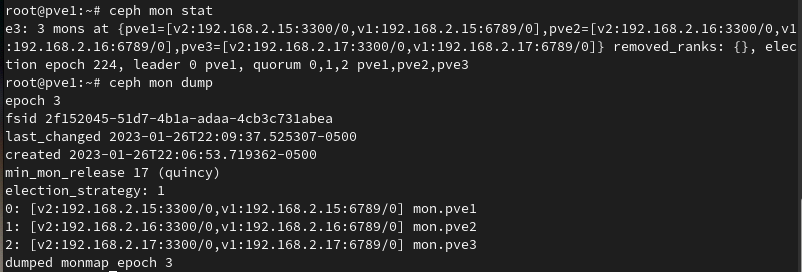
You can see in this screenshot that each of the monitors is bound for the v2 protocol on port 3300, and legacy v1 protocol on port 6789. If your cluster isn’t configured for the msgrv2 protocol yet, you can run this command to enable it on each node:
ceph mon enable-msgr2Update Repositories
Run the following command on the node to update the Ceph repositories to use Ceph Reef:
sed -i 's/quincy/reef/' /etc/apt/sources.list.d/ceph.list
In this case, as we are not using a license, we will use the no-subscription repository. If you are using Enterprise, there is a separate repository referenced in the wiki that will need to be set in the /etc/apt/sources.list.d/ceph.list file.
Set the ‘noout’ flag
Setting the ‘noout’ flag on each Ceph node for the duration of the upgrade will ensure the CRUSH map will not mark the OSDs under maintenance as “out of the cluster” and trigger an unnecessary rebalance.
ceph osd set nooutUpgrade the Ceph Cluster Nodes
Run the following to upgrade Ceph on the nodes to Reef, or run the update via the Web UI.
apt update
apt full-upgrade
This will update the files, but no restart has occurred yet, and the old Ceph Quincy (17.2) binaries will still be running.
Restart the monitor daemons one at a time
After upgrading all cluster nodes, you have to restart the monitor on each node where a monitor runs. This should be done one at a time, waiting after each restart to ensure the cluster status is either HEALTH_OK, or HEALTH_WARN due to the noout flag set.
systemctl restart ceph-mon.targetOnce all monitors are restarted and back up, running the following command should report min_mon_release 18 (reef):
ceph mon dump | grep min_mon_release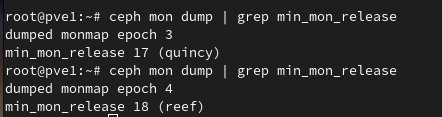
Restart the manager daemons on all nodes one at a time
Check to confirm if the manager daemon restarted with the monitor. You can check the uptime by looking at the mgr line under services by running this command:
ceph statusIf the managers did not automatically restart with the monitors, restart them now on all nodes, one at a time:
systemctl restart ceph-mgr.targetRestart the OSD daemon on all nodes one at a time
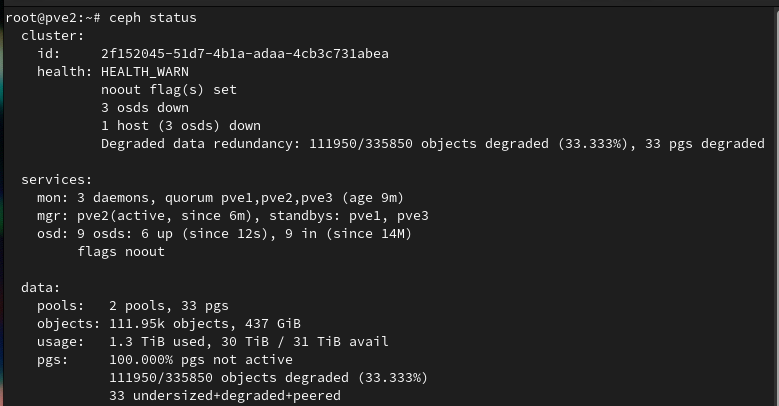
Only restart OSDs on one node at a time to avoid loss of data redundancy. To restart all OSDs on a node, run the following command:
systemctl restart ceph-osd.targetBefore proceeding to the next node, run ceph status repeatedly and ensure the health is either HEALTH_OK or HEALTH_WARN due to the noout flag set. There should be no degraded data. In my case, I temporarily saw degraded data redundancy errors after the restart, however after a minute, running ceph status showed the the error had cleared:
Disallow pre-Reef OSDs and enable new Reef-only functionality
Once all OSDs are running with the latest versions, the following warning can appear in the Web UI or when running ceph status:
all OSDs are running reef or later but require_osd_release < reef
This bugreport explains the functionality, but to ensure we are forcing Ceph to use only Reef OSDs and functionality, the following should be run once on any node:
ceph osd require-osd-release reefChecking the require_osd_release value should now show reef instead of quincy, when running:
ceph osd dump | grep require_osd_releaseUpgrade all CephFS MDS Daemons
For each CephFS file system you need to apply the following steps to upgrade the Ceph Metadata Server Daemon. Please note that you can list the file systems with ceph fs ls or check the web UI under Node -> Ceph -> CephFS.
In my case, I do not have any active CephFS filesystem, as I am only using Ceph to store the virtual machine disks, so I proceeded to restarting the appropriate Ceph MDS services.
Disable Standard Replay
Run the following command to disable standard_replay:
ceph fs set <fs_name> allow_standby_replay falseReduce MDS instance to single rank
If you have increased the ranks (maximal MDS instances active per a single CephFS instance) for some CephFS instances, you must reduce all instances to a single rank (set max_mds to 1) before you continue. Please note that if you plan to restore the rank later, first take notes of the original number of MDS daemons.
ceph status
ceph fs get <fs_name> | grep max_mds
ceph fs set <fs_name> max_mds 1
Wait for the cluster to deactivate any extra active MDS (ranks) by periodically checking the status of Ceph:
ceph statusThe number of active MDS should go down to the number of file systems you have, i.e., only one active MDS for each file system. Alternatively, check in the MDS list in the CephFS panel on the web UI that each Ceph filesystem has only one active MDS.
Stop all standby MDS daemons
You can do so via either the CephFS panel on the web UI, or alternatively, by using the following CLI command:
systemctl stop [email protected]Confirm that only one MDS is online and is on rank 0 for your FS:
ceph fs statusRestart all active MDS daemons
Upgrade all remaining (active) MDS daemons and restart the standby ones in one go by restarting the whole systemd MDS-target via CLI:
systemctl restart ceph-mds.targetReset MDS rank values
If you had a higher rank set, you can now restore the original rank value (max_mds) for the file system instance again:
ceph fs set <fs_name> max_mds <original_max_mds>Post Upgrade Checks
After performing the above steps, all of the Ceph components should be upgraded to Reef. You can verify this with the following commands:
ceph versions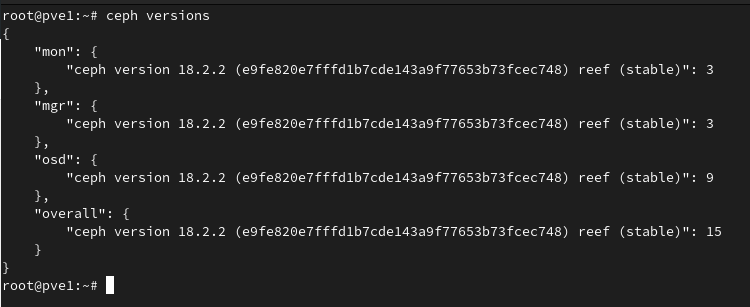
Unset the ‘noout’ flag
After verifying all of the components are updated and restarted, unset the ‘noout’ flag on each node, and check the cluster heatlh.
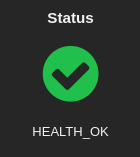
ceph osd unset nooutRunning ceph status should return a cluster health of HEALTH_OK.
Conclusion
Upgrading all of the Ceph components from Quincy to Reef is fairly straightforward, but takes some planning and checks to ensure all components are upgraded. Fortunately there are some great guides in the Ceph documentation, as well as the Proxmox wiki.
Resources
- Red Hat – Introduction to CRUSH
- Proxmox Wiki – Upgrading Ceph Quincy to Reef
- Ceph Blog – Reef Release
- Ceph Reef Upgrade Wiki
- Ceph Documentation – Upgrading the MDS Cluster
![]()