
Introduction
Before setting up some new projects in my homelab, I wanted to make sure I was up to date on the latest version of Proxmox. I was a bit behind, and had to upgrade from Proxmox 7.4-17 to 8.1.10. Because I have three nodes in a high availability cluster running Ceph, there were some special considerations I had to take. For background on the environment, see this article:
This article will go through the steps needed to upgrade all of the Proxmox nodes one at a time, ensuring that the cluster does not get out of sync, and there are no issues with Ceph. There is a method for doing the update by performing a new installation of Proxmox VE 8.x on each node, however this guide will go through the process of updating each node in-place.
New Features in Proxmox 8.0 and 8.1
As of this article (April 2024), the most recent version is Proxmox VE 8.1.10, which is based on Debian Bookworm (12.2), using a 6.5.13-3 Linux kernel:
- QEMU has been updated to version 8.1.5.
- ZFS has been updated to version 2.2.3.
- Ceph has two active versions available – Ceph Quincy 17.2.7, and Ceph Reef 18.2.0.
For more details on the features in Proxmox 8.0 and 8.1, I recommend these articles and videos:
- What’s new in Proxmox VE 8.0
- What’s new in Proxmox VE 8.1
- Proxmox Wiki – Roadmap and Release History
Considerations

Because we are upgrading between major versions (7.x to 8.x), the upgrade should be planned carefully, with virtual machine and configuration backups taken ahead of time in case there is a problem, and rollback is needed.
For upgrading between major versions, it is recommended with a hyper-converged Ceph setup to upgrade from Ceph Octopus or Pacific to Ceph Quincy (17.2.7) before starting the upgrade to Proxmox VE 8.0. In our case, we will perform the full upgrade to Proxmox 8.1 while on Ceph Quincy, and then separately upgrade to Ceph Reef, which I will detail in a separate article.
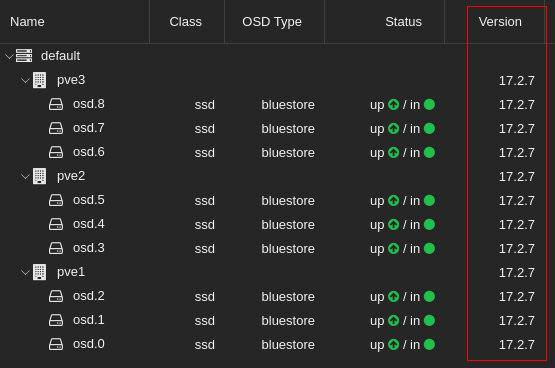
Before starting, check the version in the Ceph panel of the nodes in the Web UI, under Monitor or OSD:
Once on Proxmox VE 7.4 and above, the pve7to8 utility can be run on each node to provide hints and warnings before, during, and after the upgrade process.
The steps described below will be applied to each Proxmox node separately. Once all nodes have been upgraded and rebooted, there will be additional steps for bringing the cluster back into normal operation.
All of the commands provided below should be run as root, or using sudo with elevated permissions.
Preparation
Put Node Into High Availability Maintenance Mode
As we are working in a Proxmox environment with high availability, we want to prevent any failovers from attempting to move workloads onto the node we are upgrading. The ha-manager has a command to put the node into maintenance mode, to mark the node as unavailable for HA operation. This can be set before the upgrade, and cleared when the node is ready to be put back into rotation:
ha-manager crm-command node-maintenance enable NODENAMEDisable Ceph Cluster Rebalancing
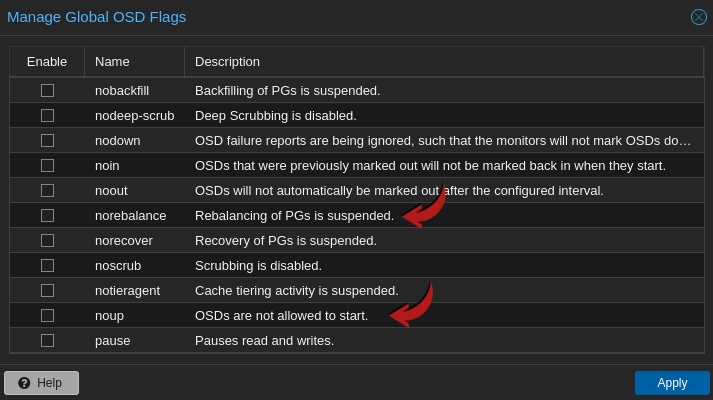
To prevent Ceph cluster rebalancing during the upgrade and node reboots, it is recommended to disable cluster rebalancing on the nodes.
This should be set on each node prior to the upgrade, and should not be cleared on ANY of the nodes until you are completely done the upgrade.
ceph osd set noout
ceph osd set norebalance
This can also be set in the Proxmox Web UI by clicking on the node > Ceph > OSD > Manage Global Flags:
This step will actually be called out if not done in the pve7to8 checklist warnings:
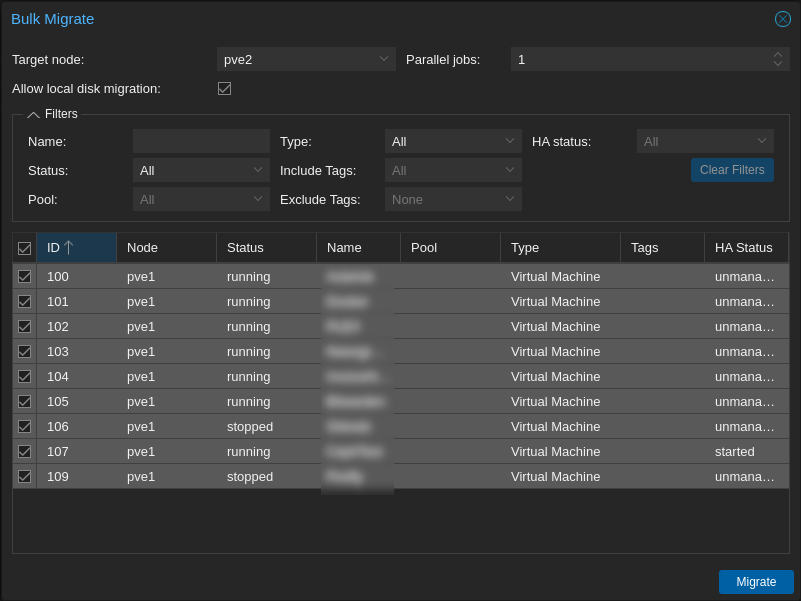
Migrate all active workloads to other Proxmox nodes
As the node will need to be rebooted as part of the upgrade, to prevent workloads from being unavailable, move all active VMs and containers to one of the other nodes while it is being upgraded. In a clustered, hyperconverged environment, this can be done transparently without having to shut down any virtual machines. This can be done in the Proxmox VE Web UI by selecting the node > Bulk Actions > Bulk Migrate, selecting all of the workloads, and selecting a target node, and clicking Migrate:
Ensure the node is up to date with the latest Proxmox VE 7.4 packages
Run the following in a command line on the node as root to ensure all packages are up to date:
apt update
apt full-upgrade
pveversion
Upgrade the Node
At this point, you are ready to upgrade the nodes to Proxmox 8.1 one at a time. We will be essentially following the Proxmox Wiki Upgrade Guide for an in-place upgrade.
Update the Debian base repositories to Bookworm
This command will do a replace on all of the apt repositories to the new Debian version:
sed -i 's/bullseye/bookworm/g' /etc/apt/sources.listCheck the sources.list file to ensure there are no invalid repositories. Because we are not using an Enterprise license, we will not be following the steps to add the Enterprise repositories, but sticking with the Proxmox VE No-Subscription Repository list. If you are using an Enterprise license, adjust the repositories accordingly, as per the wiki article.
To upgrade the Ceph repositories to Bookworm, run the following command:
echo "deb http://download.proxmox.com/debian/ceph-quincy bookworm no-subscription" > /etc/apt/sources.list.d/ceph.listNote that this will keep Ceph on Quincy for the update, which is recommended.
Refresh Packages and Upgrade
The time required for finishing this step heavily depends on the system’s performance. Run the following to start the upgrade process:
apt update
apt full-upgrade
During this process, you will need to proceed through some options and configuration, which will vary based on your configuration.
For myself, I was prompted to:
- Review the changes for the upgrade. This could be quit with “:q” to continue with the upgrade.
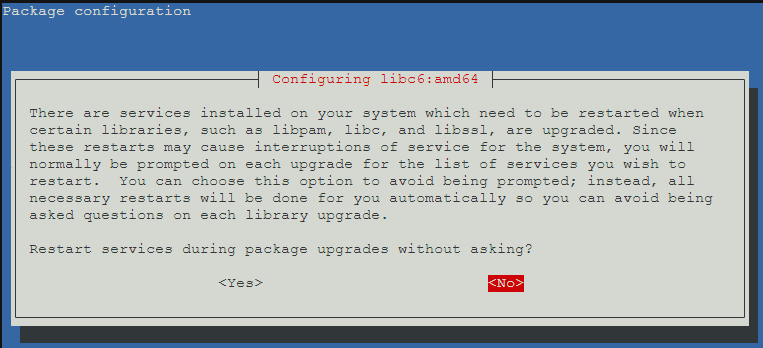
- Choose whether to allow automatic service restarts during the upgrade. In this case, as we are focusing on the upgrade, it is safe to say “Yes”.
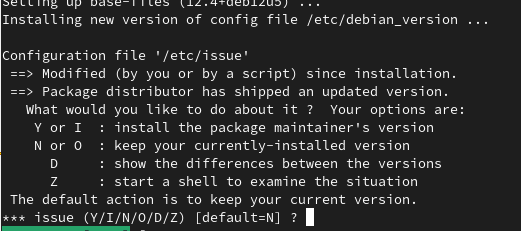
- Choose whether to leave or update the /etc/issue file. As per the wiki guide, you can select the default “No” safely here.
- Choose whether to update /etc/lvm/lvm.conf. As per the wiki guide, it is suggested to choose “Yes” here.
- The wiki article has a number of other files that may be prompted to be changed, but this is typically only if you changed the files manually.
- Once the upgrade completes, the server will need to be rebooted to use the updated 6.5 kernel. I also like to then check again for any new packages, and clean up any obsolete packages if everything appears stable:
shutdown -r now
apt update
apt upgrade
apt autoremove
Post Reboot Checks
After upgrading and rebooting, you can run the following commands to check the server has been successfully updated:
# Check the Proxmox VE version has been updated to 8.x:
pveversion
# Check the Ceph version has been updated and is still on Quincy:
ceph version
# Check that the Debian release is set to Bookworm:
cat /etc/os-release
# Check the Linux Kernel version has been updated to 6.5:
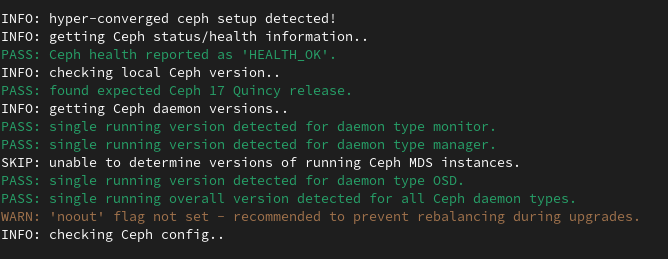
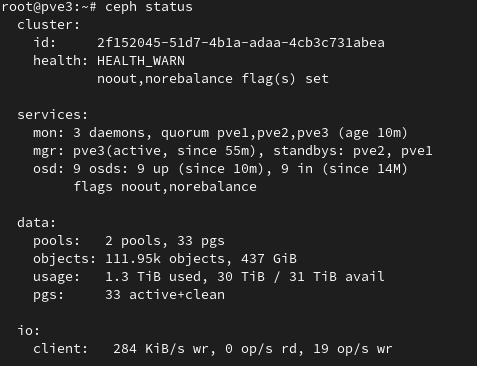
uname -aIf you run a ceph status command, you will see a HEALTH_WARN status, as the noout and norebalance flags are still set.
If you run the pve7to8 utility on the other nodes at this point, it will also throw warnings due to multiple versions, detecting that you are in the middle of the upgrade:
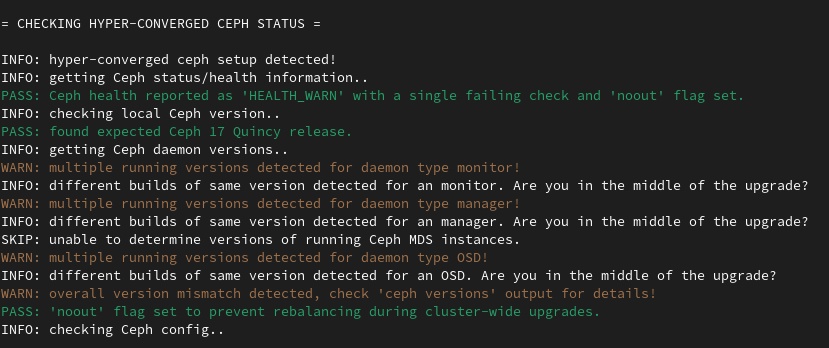
These are both no issue, and we will re-check Ceph again after all the nodes are upgraded.
If you log into the node via the WebUI, you should see the updated version in the top left corner:
It is recommended to empty your browser cache, and/or do a force-reload on the browser if the web interface doesn’t show as upgraded.
Repeat Upgrade Steps for Other Nodes
At this point the first node is fully upgraded. You can run the following command to take the node out of maintenance mode, so it can be made available for workloads to be moved in the event of a failover:
ha-manager crm-command node-maintenance disable NODENAMEIf needed, you can also migrate virtual machines and containers onto this node to clear the next node of workloads to be ready to perform the upgrade.
Once ready, repeat the above steps for the other nodes in sequence.
Post Upgrade Steps
Once all of the nodes are upgraded, log onto each of the nodes and remove the Ceph flags disabling cluster rebalancing:
ceph osd unset noout
ceph osd unset norebalance
ceph status
Running ceph status should show a HEALTH_OK message after all of the nodes are reconfigured:
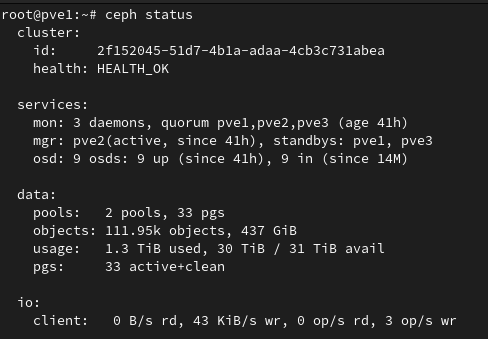
At this point your Proxmox cluster should be fully upgraded to the latest version of Proxmox VE 8.1.
Known Upgrade Issues and Troubleshooting
There are a number of known issues that can occur during the upgrade from Debian Bullseye to Bookworm. The Debian Bookworm Release Notes cover a number of known issues. Some troubleshooting steps are listed in the Proxmox Wiki, but the experience will be different depending on the system configuration.
Conclusion and Next Steps

The upgrade from Proxmox 7.4 to 8.1 is fairly straightforward, but there are a number of prerequisites and steps to check before, during, and after the upgrade. The upgrade allows us to ensure we are up to date with security patches, compatibility, and are able to take advantage of new features.
To avoid confusion, I’ve posted a separate article with steps for upgrading Ceph Quincy (17.2) to Reef (18.2):
Resources
- Proxmox High Availability Node Maintenance
- Red Hat – Rebooting Ceph Storage Nodes
- Debian Bookworm Release Notes
- Proxmox Wiki – Upgrade from Proxmox 7 to 8
- Proxmox Release Notes – VE 8.1
- Reddit Thread (thanks for all the resources!)
![]()